
Stencil DIY Tutorial - Whimsical Tree Greeting Card
I've been really enjoying working in my handmade journal that I made particularly for this project. I shared my way of making an easy journal in these two posts: making a journal part 1 and making a journal part 2
Here's one of the pages that called me to have fun with the coffee splatters that were already on it. I loved using Heidi's printable with these gorgeous stars and if you'd like to have it too, head on over to her site where you can enroll in her December FREE offering called Stillness and Rest: December Reflections. She has many printable goodies prepared too :)

I absolutely still love using my own stickers that I made for my blog post with the tutorial on how to make your own printable sticker sheet. They definitely are everything December is to me, plus more.
So my other pages look more like a journal but they all have some things glued on. Be it these stickers or photos I print out from my phone that hold a special memory. Looks like my intention for a magical December is still working as my days have been blessed with many beautiful things. Also a few interestingly painful ones which I received as lessons to be learned from my Spirit Teams and my Soul. These intentions are truly powerful! When I asked for my Team to let me know they are here they are showing up all the time. I keep seeing double digit numbers all the time because they know how much I love catching them.
Now let me get to this week's offering. Here's a short tutorial on how I go about making my own stencils. It's a very easy process but it does involve a bit of precision when cutting. Well, depends on the image of course so I came up with a relatively easy one which can be used to make Holiday Greeting Cards. We all need these at the moment, right?
You'll need a thicker paper to print on - I'm using something along the lines of 110 grams (not sure as it doesn't say on the packaging) - scissors or exacto knife, self adhesive see through foil (or clear sellotape). After you'll have your stencil made it's up to you what you will use over it. I used stamping pads (rather dried out ones :) ) and then I added embellishments with sparkly pens, colored pencils and with a little star from Heidi's printout.
Let's begin. Firstly, prepare your design. As we are going to make A6 greeting cards my design is made on an A6 sized paper. You can sketch out yours as you wish or use mine - subscribers get a link to it in my Newsletter. Print it out on A6 thicker paper.

Then cut out two sheets of clear self adhesive foil that are a bit bigger then your printed design. Think about 1 cm on every side. Stick them onto the printed design on both sides. If you don't have this foil use clear sellotape just as I did in my first tutorial about stencils than can be seen here.
Here's how I do it to get the best results. Don't fret if you get air bubbles, they don't matter as long as you have your clear foil/sellotape glued on really well.
I start by taping down the shorter side of my foil rectangle like so. Pink line is the end of the foil.

Then I add my printed paper underneath the foil and align it with the pink line about 1 cm away - yellow line:

I then roll away the paper that is sticking to the foil as smoothly as I can while pressing the foil down on my printed design. Once I'm done, the foil is glued onto my cutting board and I smooth it down to paper with my bone folder or something with a hard plastic edge. You want to have the foil sticking to your printed paper as firmly as possible as it will be easier to cut the stencil out later on.
Peel away from the mat your printed paper and cut away the foil edges.
Then stick the other piece of the foil onto the other side of the printed paper following the same procedure. We need our stencil to have the foil on both sides so that we can use it over and over again because the foil makes the paper somewhat waterproof.
Once you cut away al the foil edges you can start with cutting out your design. In our case, we are cutting out everything that is colored grey. Once you outline the whole design with your exacto knife - press down as much as you can as the paper is thicker - turn it on the back side to see if you missed a spot. Correct that and carefully take the cut part out.

Here's how my finished stencil looks like all cut and shiny :)

Time to test it! This is always soooo cool as one never knows how it will look!
I took one of my blank greeting cards and my stencil ...

and I positioned my stencil on top of the greeting card and stuck them both down on my table with two pieces of sellotape so that they couldn't move while I was adding color to my greeting card:

I chose three colored stamping pads for this and begun with the purple one first. Making sure I wasn't going over the window of the little house:

I kinda liked the effect I got from my pad being half dry :) I added the blue and yellow afterwards:

Then I prepared myself some white tempera to drip on some snow :) You can take gouache or white acrylic too. All of the mentioned options need to be diluted with some water so that we can sprinkle them over our picture with a brush.

Once you've sprinkled over the snow, leave everything to dry before removing the stencil:

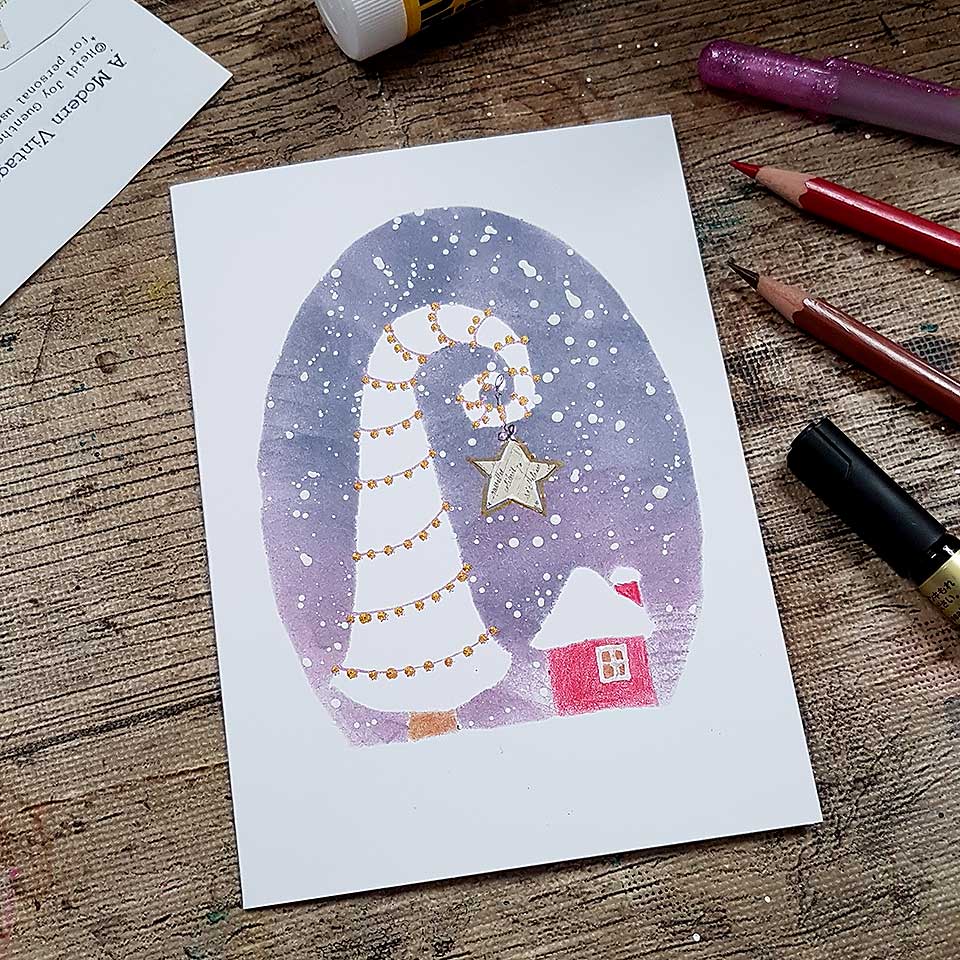
Here's how my card looked like when I removed the stencil:

I decided to add some color to the house, chimney and tree trunk and I also drew some lights onto the tree. Go wild here. Every greeting card you make can be slightly different. I also added Heidi's cute little star from the printable she so generously offers:

I hope you find this tutorial useful and that you will give it a go. Id' love to know what you think and also, let me know in the comments if my instructions need more clarification.
I am wishing you a fabulous week and I'll see you right here next Thursday.
With much love,
Nina
Comments
Post a Comment
I sincerely appreciate every comment I receive and I will reply to it as soon as I can ♥