
Tutorial - Making your own printable sticker sheet
Using stickers anywhere - in journals, art journals, on the walls, phones, you name it - is really fun. And one quickly becomes obsessed with hoarding all sorts of sticker sheets and cute washi tapes from everywhere. I know I do :)
So today, I'll show you how to go about making your own sticker sheet - even if you don't draw or paint. And my subscribers will be getting this same sheet as a .pdf to print out at home and enjoy using for years to come. Hope you find this little tutorial useful and that you'll share your sticker sheets with me once you get going. It's fun, I promise :)
Right, first thing you need is Canva account. I'm talking about https://canva.com, a really cool online place where you can create and design all sorts of graphics and things to use online or to print. Just go there and create your account, it's free unless you want to use their premium photos, templates or transparency when downloading and such things, but for our project, free is plenty enough.
When you're logged in press the "Custom size" button in your top right area of home screen, just under "Create a design" button:

Clicking "Custom Size" button gives you a new window into which you put the measurements of your sheet of paper onto which you will be printing later on:

As you can see, I chose mm for my size (you can also choose px (pixels), cm or in (inches)) and I wrote in the boxes 210 x 297 mm to get a portrait oriented document ready to use. If I'd typed in 297 x 210 mm, Canva would give me a landscape oriented document to design on.
When you input all the numbers and press "Create new design" button, a new window opens and you're in a designing area of Canva. It looks like this for my portrait A4 sheet of paper:

The default place for designing is the "Templates" tab - see your left hand side of the screen. Under "Templates" there's also "Elements", "Uploads", "Text and ".." more tabs. We are currently not interested in anything else but "Uploads" so click there and see what happens :)

Now we need to upload our images that we want to print out as stickers. If you have your own images that you painted or drawn and scanned into your computer then upload those. If you don't have them, here's an awesome site to bookmark, as it has loads of goodies that are completely free to use. I'm talking about The Graphics Fairy. Be warned though, this place is a total rabbit hole and you just might end up hours on it and download every cool image you see. If you do, I promise I won't judge you as, well, khm, I'm totally guilty of being completely overwhelmed when I discovered this place myself and have spent hours clicking around and saving onto my PC drive.
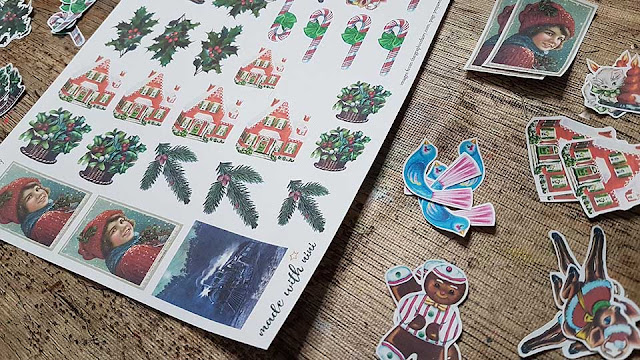
The sticker sheet I'll be making, uses images from Graphics Fairy site. I searched for Christmas and winter related themes and spent a few hours browsing just to find what called me, what I thought would be cool to use during this December's Magical project. You go and find your perfect images and when you find something, click on the image so that the biggest version opens up for you, right click on it, and choose "Save image as ..." to save it into a folder of your choice. It's good to have a folder just for such images so you'll be able to find them later on. Once you saved your selected image, hit "back" button in your browser to go back to the article you pulled your image from so that you can continue with downloading.
Just in case you have never downloaded a thing before and have no clue about what I just wrote, let's go there together and see what I'm talking about. Follow this link to "15 MERRY CHRISTMAS IMAGES" Top of the page looks like this:

Scroll down to find an image you like and click on it. I'll just use the first one. After I click on it I get this:

You can't see it here but the mouse pointer changed into a small magnifying glass with a + sign inside it. This means this photo can still be enlarged if clicked on. We don't need to do this but we do have to right click our mouse to get the menu with "Save image as ... " option:

What I do is, I just download everything, especially if there's more files than one, into the "Downloads" folder on my computer so that when I'm done, I grab all of them from there and just re-locate them to a specific folder for my keeping. Once you have all your files ready in your folder, and you know where it is, go back to Canva and upload all those files to Canva.
Click "Upload media" in your left hand upper corner and choose the image files you want.

After you upload your chosen images, they appear in the open tab:

And now it's finally time to prepare our sticker sheet. Just click on the image you want to be added to your sheet of paper and it will appear there. I'll start with the ginger man first. When I click on him he pops onto my page like this:

As you can see, he is way too big (at least for what I'm trying to do) so I need to resize him. That's really easy in Canva, just hold and drag one of the corners and change the size to what you want.

Here's a little trick. I have set the page view on my monitor to 100% (see bottom of the screen in the above photo) so that my "online paper" looks about the same size as in real life so that I can asses in real time how big my printed sticker/image will be. If I was working in a smaller view I would probably end up printing all the images way too large and would need to re-do everything in my second attempt. Mind you, I am doing this on my PC where my monitor is big enough for this. And I checked the size by holding the real paper right in front of my screen - can't get more realistic than this ;)
So, when you re-size your image just select it again and drag it around your page and leave it where you want it. We can still re-position everything later on as usually these things take some time to position just right or for the best paper usage.
Making duplicates of the desired image - select your image so that it gets the selection box around it and then right click on your mouse to get the menu with copy, paste, delete etc:

Choose Copy first, then right click anywhere on your paper and choose Paste. The duplicate of your image appears and you can do this multiple times. You can also do this by pressing Ctrl+D on your keyboard when you have an image selected - the duplicate appears immediately.

Here, I pasted three ginger men and decided to flip the middle one to use up my paper more wisely:

I selected the middle ginger man and used "Flip vertical" command in the upper part of my menu - see photo above. I got this:

Time to fill up the page now. Proceed with the same steps I just described until you have your page full of the images you want to print out.
Because we are working with .jpg images that do not have transparent backgrounds, sometimes the white of the background is making a bit of a mess. Let me show you what I mean with this bird ornament image. I pasted 4 birdies and flipped them around as I wanted. But I got this overlapping I didn't want so I right clicked on one image and chose "Send Backward" to get it below the previously pasted bird:

It ended up looking like this:

There's one more thing we need to keep in mind and that's printer margins. Most printers can print full size across the whole page but it's much easier to just take into account a bit of a white border - like 5 millimeters - all around the page and not position our images there.
If you want to rotate an image, then select it and rotate it by holding rotation handle that I'm pointing to in this next image:

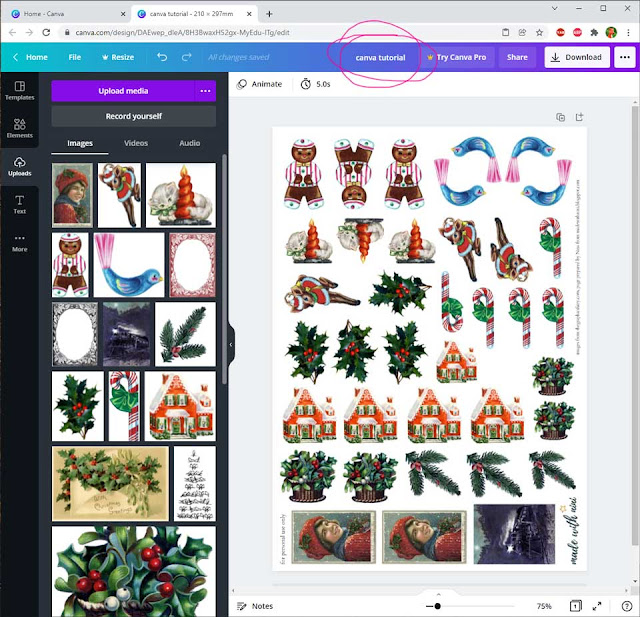
So really, all that's left to do now, is filling the page up, rotating the images, flipping them horizontally or vertically, sending them under or above the images next to them... you'll get the hang of it. Once you're satisfied with your page it's time to download it. You do this by clicking on the big "Download" button in the upper right corner of the screen. I will save my page as .pdf but you can choose .jpg too:

If you look at the image above, text on the left side of the "Try Canva Pro" button captured the text I put onto ma page. This is actually going to be my file name so unless you are satisfied with "untitled design" as we had it before I added the text I suggest clicking on it and changing it. I changed mine to Canva tutorial and you can see my final page here. With the name of the file too:
So this is it! I hope I was clear enough and that you will try this by yourself. There's so much online we are allowed to use for personal projects so why not make our own stickers and prints. Oh and when you want to print stickers, use sticker paper printing sheets that petty much all the printing paper brands have. I always go for Avery Zweckform and I'm going to try out my newly bought transparent sticker paper that Heidi recommended for one of my printed sheets.
Also, have a look around Canva as it has loads of images and clip art to be used for such a printable project too. You can find them under the "Elements" tab on the left side of the screen. Do explore and get creative, it's fun! :)
Let me know how you find this tutorial and tag me online if you try it. Use #madewithnini so that I can find you.
With much love,
Nina


Comments
Post a Comment
I sincerely appreciate every comment I receive and I will reply to it as soon as I can ♥