
Manifesting a Magical December - Making a journal - part 2/2
Welcome to part two of this tutorial about making your own Magical Journal from scratch. In part one we covered how to prepare the covers and you can find that here.
In this part I'll be shorter. I'll explain how I went about making my inner pages and how I bound my journal.
As my recycled papers were A3 size and I knew I wanted a smaller journal - A5 - I knew I will have to cut them in size to get there. So I painted them accordingly. To get my final pages to have their upper and bottom side in color, I needed to paint my big papers like this:

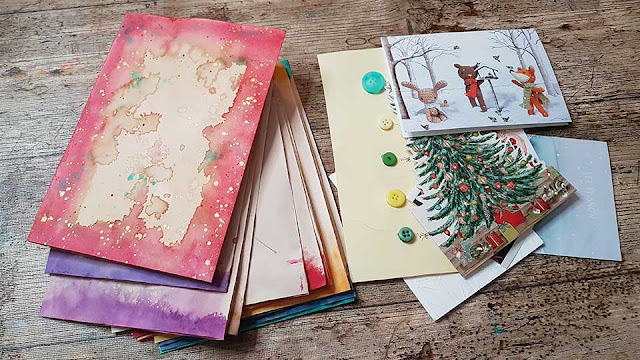
This particular paper even had a fold in the middle so I knew where to paint my stripes of colour. I didn't fold the others so the results were much more unpredictable :) But I love my final papers and their perfectly imperfect colorings. Here's my stack of painted papers and my cover in the back:

As I decided to add the greetings cards I received at the end of last year into my journal and one piece of last year's wrapping paper my stack of folded papers only grew:

What I'm trying to say is, gather all your colored papers, or just papers folded in half and start making your journal. I have 13 colored and folded papers in my journal which gives me 13 x 4 pages to write/draw on, that's a lot of pages, 52! All the additional cards and papers only give me more space to be creative with. If you'd like a thinner book, using 8 papers gives you 32 pages which means you can use one page per day. That will make it easier to sew too, much easier :)
So, stack your folded papers and whatever add-ons you have, one on top of the other, folds in the middle, and make a pile. See how you like your pages flow and rearrange them to suit your taste. Then take your cover and put your pile in it. Mine looked like this:

The simplest way to "bind" all of this together is with an elastic :) Yes, with one of those round elastics. Could also be a ribbon but it won't have the same "hold". Neither will have your pages perfectly put in place but they will hold together and you will be able to work in your journal. You would even be able to take them out, work on them and put them back in. Here's what I'm talking about:

All you need to do is cut a length of elastic that wraps around the middle of your "pages over covers" pile, stretch it a bit and tie a good square knot. And that's it. Journal done. Time to start using it :)
But. If you're like me and want to have these pages not be so movable, then proceed with a simple pamphlet stitch book-binding method.
You need some thicker thread, a good needle and something to make holes through all your pages and the fabric spine with. I usually use only one of my sewing pins for this but this time I had to use the book binding owl as the thickness of all the papers with the greetings cards was too thick.
Before you begin making your holes, clip your papers and the cover together on one side, so that they don't move while you make the holes nor
while you sew. You don't want them to move one bit as you will loose your
holes!
Pamphlet stitch is usually done via 3 holes only. Or 5 if your book is larger. I had to make 7 holes because I used those greetings cards between my pages and some were really small so I had to make sure I will be sewing them in well. And luckily I did as I wasn't measuring anything.
Here's how the 5 hole pamphlet stitch looks like. If you start sewing from the outside you have your thread tails there, on the outside. If you start from the inside then your knot and tails will be inside. I suggest using 5 holes instead of 3 as it gives better grip over the papers.

Here's how I go about making holes through my papers. I take an old book to put below my stack of folded papers so that I don't ruin my desk and so that the old book holds everything just in the right position for the hole making. On this photo here, I was able to make the hole with my sewing pin but in some other areas I had to turn to my owl.


When you have your holes made, thread your sewing needle with enough thread that is about 3 times as long as your spine is. Then start through the middle hole and proceed as you see on the diagram.
I filmed my struggles as it's much easier to explain these things visually - especially with all the trouble shooting which, in such a thick, one signature book, is unavoidable :) But please, have no fear. However your book turns out is 200x times better then not making it at all. Please trust me on this. There's such joy in using your own handmade books. Especially for this kind of a project.
So, here's my video tutorial. It's not of the best quality as I had such limited time but at least you see it's doable and that you too, can totally have your own handmade journal for the big lovely start on 1st of December. I totally encourage you to try it out.
Or have your book held together with a nice shiny elastic. That's pretty perfect too.
Anyways, here's my tutorial:
I hope you will enjoy your time creating this special journal and maybe share it with me via FB or IG. Use #madewithnini or tag me so that I can see it. I'd love to see it, really.
And since you are going to hear/read from me on December 2nd, here's what I'd like you to do with your journal on December 1st when we start:
- set aside 10-15 minutes and have that time only for yourself
- light a candle and set an intention for this project. Take a piece of paper and write down about what you would like to manifest or pay attention to in December. It may be signs from the Universe regarding a specific question, maybe feeling a certain way, finding something, maybe you have a specific goal in mind you'd like to achieve. Just write, ask for guidance if you need it and then fold this letter and put it in the back pocket of your beautiful new journal. Let it stay there till the last day of December when you'll take it out and see what came true, what messages appeared, how you felt. Let this be your personal experiment in being in contact with the Universe, your Spiritual Teams but mostly, your Higher Self.
- also write shortly about this on your first page. Maybe you already received something and you can write about it there. Embellish your page. Spend some time with your journal. Be creative, use stamps, stickers, glue down an image from that magazine you have lying around if it called you.
- do this every day till the last day.... spend at least 15 minutes writing about the highlights of the day, what are you grateful for that happened that day, what brought a smile on your face, who or what lift you up. Write about all the good stuff that happened during the day. If you ran out of paper, write on something else and then use some pretty washi tape to stick it onto the page. It's really fun to have our journals get bigger because of all the nice things we can write down :)Add pockets to your pages to hold your longer writings.
- remember, this journal is here to uplift you, to be your high vibe buddy, to be the container for all the magical things that will be happening to you because you will be in a higher vibe, because you will be feeling good. And if you see something during the day that sparks an interest, take a photo of it, especially if it has to do with your theme, with what you're paying attention to, print that photo and glue it down in your journal. Visuals only enrich these pages and make your journal even more valuable for you and more authentically you.
I hope this all makes sense and that you will enjoy co-creating this December into a very special magical adventure. May it be an awesome one for all of us! See you soon. Let's enjoy this creative journey together.
Oh and let me know if there's anything I forgot to mention, if my instructions aren't clear enough or just say hello :)
With much love,
Nina


Comments
Post a Comment
I sincerely appreciate every comment I receive and I will reply to it as soon as I can ♥