
Making Stencils - DIY
I see stencils used a lot in art making - they are perfect for adding interest to backgrounds or look good as stand alone feature. Many use them for making patterned wall accents or simply to make cool T-shirts with them. Well, as versatile as they can be they can also be quite expensive and push you into another art related addictiveness. So I decided to make some by myself using quite ordinary house-hold things. I do confess though, I wouldn't mind owning one of those cutting machines because that would make making my own stencils a breeze :)

Here's what I used:
- print of a pattern I made myself (I'm sharing a few at the end of this post), Print on a thicker paper like 120g
- clear tape OR clear self adhesive vinyl (I have a roll of it - intended for wrapping notebooks - and I get it in our supermarket stores at the school section)
- precise cutting knife - I have one from Derwent
- ordinary cutting knife - can be used for cutting out the stencil too
- cutting mat
 We need to make this print water proof and we'll do it by covering it on both sides with clear vinyl or clear tape - whichever you have at hand.
Using the self adhesive roll type of vinyl I start by cutting a piece of it that is a bit larger than my print. Then I tape it down on the cutting mat so that it stays put while I insert my print under it:
 Then I adhere the vinyl on the paper slowly and I push the air away as I go:

When I'm done I cut away the excess vinyl with my cutting knife:
 Time to repeat the process on the other side. I'm using clear tape here and as you can see I had a bit of a "problem" because the thing adhered itself on my paper before I had the chance to align it properly. So I continued taping diagonally because it really doesn't matter how you cover it. It's a bit trickier to use tape because it's so thin but you'll get the hang of it:
 Cut away the excess tape when you're done taping.
Using the most precise cutting knife you have, start cutting out the stencil image. I found out that the best thing to do is, to rotate the paper, not your knife. And press your knife quite strongly so that you cut all the way down, because if you won't you'll have to cut again. Changing your knife's blade to a brand new sharp one is a must too!
 Because the image that is cut out can be used later too I do my best to cut it out nicely.
Here's my finished stencil with the cut outs. All ready to be used :)

You can also draw your image to the paper before vinyl-ising it or you can use an image from a magazine. The sky is the limit here, so go crazy ;)
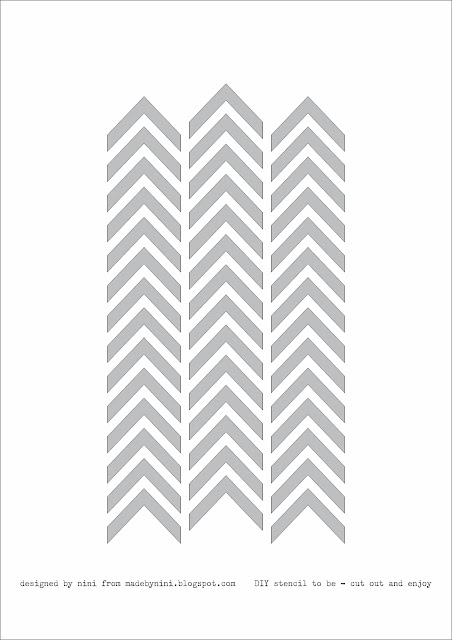
But, as promised, I made a few patterns for you to print out and make into stencils - right click and choose "save image as" to your computer. They are A4 size but you can print them in any size you want. Have fun with them and if you make the stencils, please let me know about it, I'd love to see what you did with them.


Here's what I used:
- print of a pattern I made myself (I'm sharing a few at the end of this post), Print on a thicker paper like 120g
- clear tape OR clear self adhesive vinyl (I have a roll of it - intended for wrapping notebooks - and I get it in our supermarket stores at the school section)
- precise cutting knife - I have one from Derwent
- ordinary cutting knife - can be used for cutting out the stencil too
- cutting mat

Using the self adhesive roll type of vinyl I start by cutting a piece of it that is a bit larger than my print. Then I tape it down on the cutting mat so that it stays put while I insert my print under it:


When I'm done I cut away the excess vinyl with my cutting knife:


Using the most precise cutting knife you have, start cutting out the stencil image. I found out that the best thing to do is, to rotate the paper, not your knife. And press your knife quite strongly so that you cut all the way down, because if you won't you'll have to cut again. Changing your knife's blade to a brand new sharp one is a must too!

Here's my finished stencil with the cut outs. All ready to be used :)

You can also draw your image to the paper before vinyl-ising it or you can use an image from a magazine. The sky is the limit here, so go crazy ;)
But, as promised, I made a few patterns for you to print out and make into stencils - right click and choose "save image as" to your computer. They are A4 size but you can print them in any size you want. Have fun with them and if you make the stencils, please let me know about it, I'd love to see what you did with them.


Great post, thanks for sharing some patterns we can use, they are very pretty. :)
ReplyDeletethis is so great! lovely stencils, and great tutorial. thanks for sharing, Amazing Nini! Interesting how you used the vinyl material to make it waterproof.
ReplyDeletecoolio! :)
Why thank you Suzi! I hope you'll make at least one ;)
ReplyDeleteMiss Palencar, as allways... thank you so much for your support!